You’ll notice the two Shrimp Taco pictures above look a little different from the ones below (Ground Turkey Tacos). Well, they are. I made them more than once (yes, they are that good!). The first night I made them with boiled green plantains so they were softer and easier to digest. That’s why I think they turned out darker than the yellowish ones, below.
Latest Posts
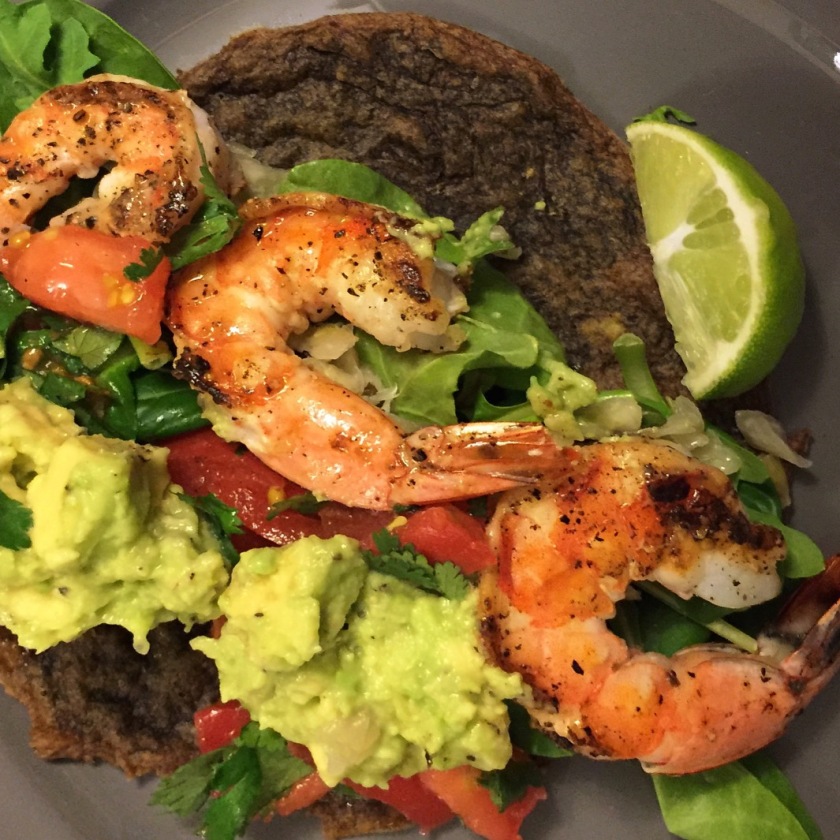
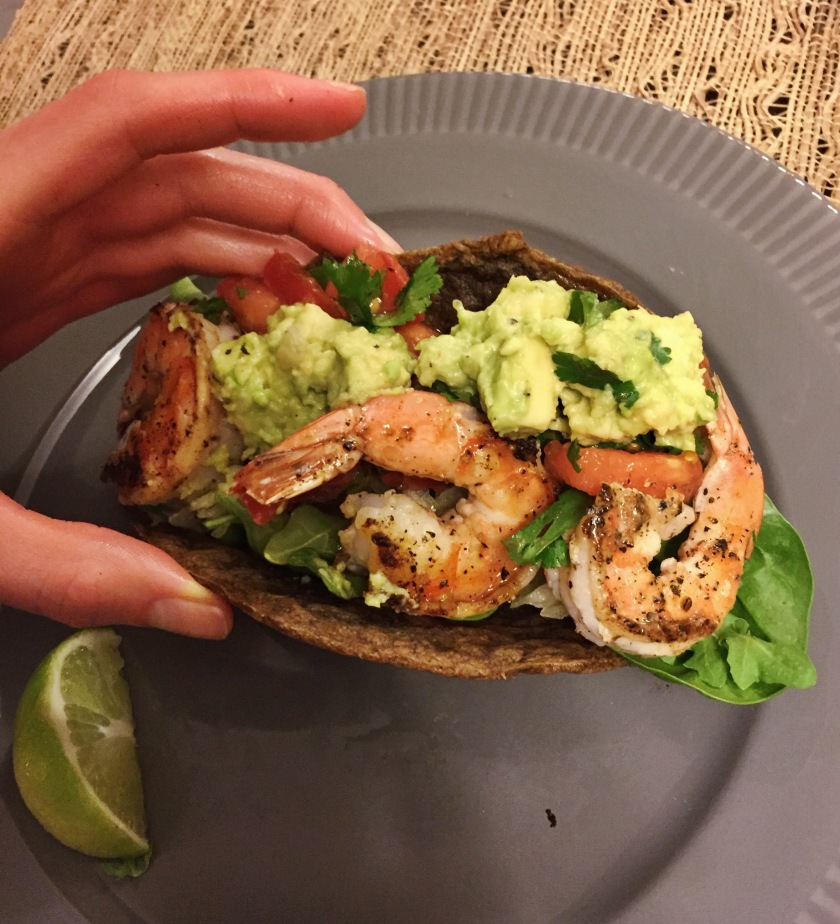
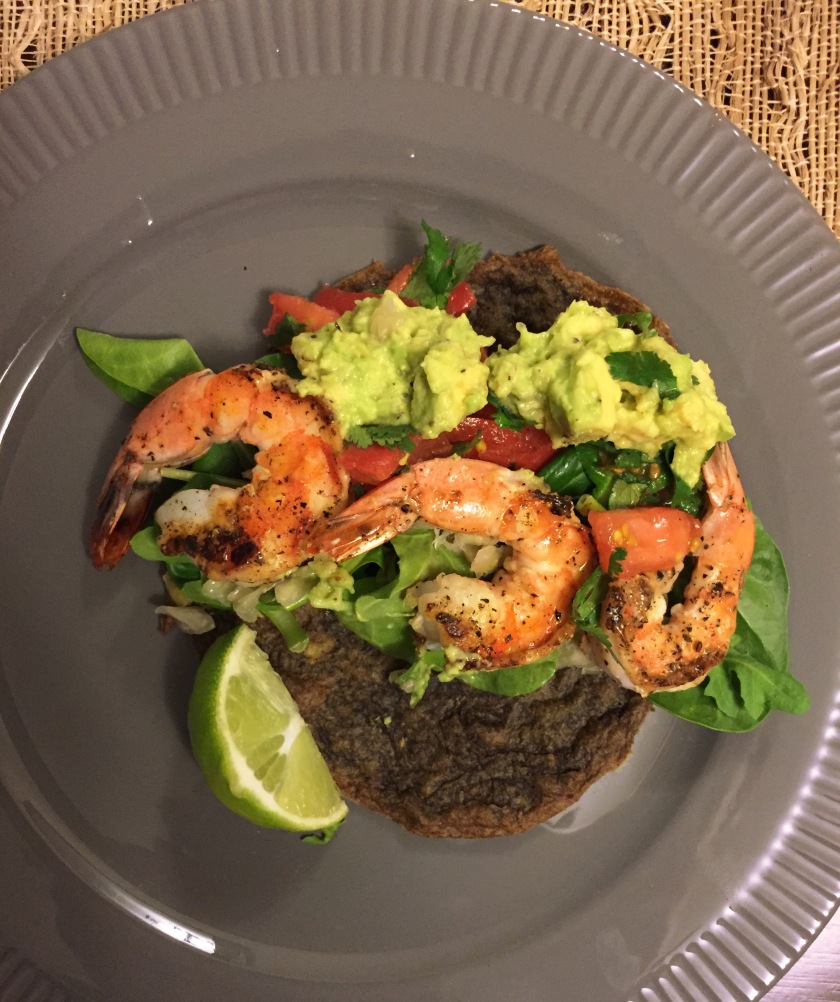
Plantain Tacos with Shrimp (Paleo and FODMAP) 1 of 2
Sometimes a night calls for tacos. You can probably guess how excited I was to find a recipe for taco shells that fit the Paleo and FODMAP diets (what I’m eating now on my journey to health). Here is a recipe that will knock your Paleo socks off: plantain tacos with shrimp. It’s a recipe that can be filled in many ways (stay tuned for another filling idea in my next post, you’ll get to use today’s leftover taco shells!).
So easy to make, healthy and delicious—I just fell in love with plantains after eating this. If you’re not yet sure about the whole “Paleo thing”, this just might change your mind! I ran into this recipe from Fresh Tart, and I must say, it is quite tasty.
With a grain-free meal, find foods that will fill you up and replace hardy grains. After a class of Tae Bo (cardio boxing) this is just the meal that satisfies me. And the taco recipe is ridiculously easy! Five ingredients that make freezable leftovers (if need be). That’s what I call a quick, weeknight meal.
I made these shells with boiled, green plantains to make them softer and easier to digest. (Green: A starchier, unripe stage for a plantain.) The starchy is good for making a firmer corn-like shell. The mark of a true winner? They held up to monstrous amounts of filling. (Note: The filling may not be pictured as monstrous—I ate some filling off the top before I took the photo. Hey, trying to keep it pretty for you guys 😉
Whether or not you have dietary needs, these tacos are still worth the eat! My perfectly healthy sister comes over to eat my food, time after time again, and so does my gluten-loving husband. That’s how I get a stamp of approval to get these killer recipes posted.
Keep making those recipes that make your body happy and healthy!
Recipe
Serving: 12 tacos | Time: 45 min.
Ingredients
Plantain Tacos:
3 large green plantains
1/3 olive oil
1/3 C water
1 tsp sea salt
1 tsp baking powder
Shrimp Tacos:
6 Jumbo shrimp
1 Big handful of spinach, chopped
1 Avocado
1 Heirloom tomato
1 Bunch cilantro
2 Limes
Salt and peper to taste
Directions
Taco Shell:
-
Preheat the oven to 400 degrees and line two baking sheets with parchment or foil and coat with coconut or olive oil. Start with making the taco batter. If you’re using green plantains, cut, peel and boil for about 10 minutes until fork goes in easily (but don’t over cook to mushiness). Take them out of the pot, drain and let them cool in the freezer.
-
Take the plantains out of the freezer when they are cool to the touch. Puree all the taco shell ingredients in a food processor. You should be left with a very thick batter. Place spoonfuls onto the baking sheets and spread batter into a circle, 1/4 thick. Batter makes 6 rounds on each pan (total of 12 shells).
-
Bake for 15 min. and then flip and cook for another 10 minutes until fully cooked and crisp.
-
If you like them crisper on the outside, bake them for 15 min. and put them on a pizza stone for 5 min. Flip and cook for another 5 min.
-
Fold the shell in half when cooling so they can be flexible to hold your filling!
Shrimp Filling:
-
Clean and de-shell shrimp. Salt and pepper each side. Sauté them on med-high head in coconut oil. Add a squeeze of lemon. Cook on each side for 2-3 minutes, or just until they are pink and opaque, but still juicy. (Higher heat cooks them fast and keeps them from being rubbery and dry.)
-
While cooking the shrimp, chop the spinach.
-
Make the guacamole: Mash the avocado, add 1 T of lime juice and a squeeze of lemon. Salt and pepper. Add chili or cayenne pepper for spice. (If following FODMAP, limit amount of guacamole to 1/4 C.)
-
Make salsa: Dice the tomato, chop the cilantro and stir in a squeeze of lemon. Add salt to taste.
-
Assemble taco with spinach, shrimp, guacamole, salsa and sauerkraut on a plantain taco shell.
-
Voila! Dinner is served.
Mint Cantaloupe Smoothie
 Good morning! Here’s a healthy breakfast that will get your day going. It’s packed with nutrients to help keep you focused and working hard so that you can finish up work and start off your weekend early. Since my handy Ninja blender needed washing, I lugged my chunky food processor down from the cupboards to make today’s smoothie. Definitely worth the muscle—it’s that good!
  Cantaloupe is hands-down my favorite ingredient to add to smoothies because it’s not too sweet and provides juicy goodness so that you don’t have to add a lot of liquid. In addition, it’s loaded with nutritional benefits. One might call it a “wonder-fruit”. Here’s why:
- High vitamin C = protects your cells from oxidation, prevents diseases
- Ample amount of vitamin A = promotes cell growth, healthy skin
- Good source of Potassium = increases metabolism
- Natural diuretic = Reduces water retention
Below is the recipe for Mint Cantaloupe Smoothie, but you can easily swap out the cantaloupe and peach with any of your favorite fruits. Enjoy your Friday morning boost—cheers!
Recipe
10 minutes | yields 1 serving
1/4 Cantaloupe
1/2 Peach
1/2 Frozen banana
1/3 C Almond milk
1 Bunch of mint
4 Ways to Get Your Daily Dose of Avocado

I’ve made it my practice to have an avocado every day, and fortunately for me, my doctor encourages me to continue my healthy obsession. Particularly with diet restrictions, like gluten- and dairy-free, it can be difficult to find healthy foods that keep you satisfied. When I went on an elimination diet, it became more important to eat vegetables and fruits that were the most nutritious. Although 21g of fat per avocado may scare anyone at the drop of the word “fat”, avocados contain good cholesterol that benefits you by removing the bad, artery-clogging cholesterol.
The Mediterranean diet shatters the fundamentals of the trendy, fat-free diet by including plenty of healthy fats from olive oil, avocado, fish and nuts. Not only do avocados contain healthy fats, but they also contain nutrients that help decrease inflammation, blood sugar, blood pressure, and help prevent cancer. [Click here to read about these benefits.] Meanwhile, they promote a healthy heart, skin and brain function. Wouldn’t you want to eat what makes your body healthy, gives you shiny hair and beautiful skin? Avid Mediterranean dieter Penelope Cruz thinks so.
Let’s talk avocado meal ideas. Try incorporating one suggestion per day:
Breakfast
Add half of an avocado to your smoothie for an extra creamy texture and a fiber boost. Or, if you enjoy eggs in the morning, cut an avocado in half, remove the pit and drop an egg inside the hole. Season and bake until egg whites are firm.
Lunch
Avocados also make a perfect substitute for mayonnaise in a tuna salad. Blending an avocado in soup adds a creamy texture, while also adding a good source of fiber. Its high fiber, 10g an avocado, keeps your digestion mechanics working. And the best part, they’re dairy- and gluten-free, and vegan!
Dinner
Make your own burgers with ground meat and bind with eggs, avocado, and spices. If you’re looking for a chunkier avocado recipe, top chicken, vegetable stir-fries or pastas with avocado for a great meal. Healthy fats are also a good idea at dinner because they trigger satiety and the omega-3s have a calming effect on your brain—perfect before bedtime. Sweet dreams!
Dessert
An avocado probably didn’t come to mind when thinking of dessert, but avocados make this chocolate mousse sing: Vegan Chocolate Mousse. Since an avocado is a fruit, it deserves a place on the dessert table.
Brownie Torte

Get out your baking pan, it’s time for brownies! These are special, rich chocolate brownies, made with the best ingredients like raw cacao. Recently, I’ve been following Purely Twins’ blog, written by a set of twins that eat healthy, who are certified personal trainers and address health challenges with nutrition and a healthy lifestyle. I admire their approach to cooking, making food variations that fit any dietary needs.
If you follow my blog, you may not be surprised that I added chocolate chunks to this recipe—more chocolate the better! I also dusted the brownies with powdered sugar, giving them an elegant look.

Cacao vs. Cocoa
Usually, I’ll grab Hershey’s cocoa powder, but today I’m using the very best quality cacao. So, what’s the difference between cocoa and raw cacao? They’re both made from cocoa beans, but raw cacao is made by cold-pressing unroasted cocoa beans, whereas cocoa roasts cocoa beans at a high temperature. Cold-pressing keeps all the nutrients and enzymes alive, making raw cacao the very best kind of chocolate you can eat.
The brownies are gluten, dairy and grain free. Apple sauce replaces the eggs, too. Next time I will try pumpkin instead of apple sauce, so if you try pumpkin, comment—I’d love to hear how it went!

This recipe also uses plantains. I was skeptical at first because I didn’t want the brownies to taste like chocolate covered bananas (although those are lovely!). But there isn’t a pronounced banana flavor because plantains have a mild flavor, making them a perfect ooey-gooey mixture for your brownies.
Grab a fork and dig in!
By cooking the brownies in a pie dish, like I’ve done here, I made it a torte—ensuring EVERYONE gets a bite the extra moist center! Whether they are hot right out of the oven with caverns of melted chocolate, or cold and chewy, these brownies are delicious!
Recipe
35 minutes | yields 12 servings
Ripe plantain
Raw cacao powder
Baking soda
Baking powder
Vanilla extract
Applesauce
Maple syrup
Coconut oil
Coconut butter
Click here for Purley Twins’ Fudgy Flourless Chocolate Brownies!
Minimalist Baker’s Gluten-Free Waffles

Now that you’ve experimented with gluten-free flour from my last post, it’s time to put it to the test. I made these waffles when I went home to visit my dad. There’s something about being home and baking for breakfast—makes me want to stay in my PJs all day and sip tea while I watch Giada Delorentis making creamy polenta or Bobby Flay throwing down a spicy dish. The key to a perfect waffle is the crisp crust coving the soft bread inside. The key is coconut oil. You’ll need to coat your waffle maker with coconut oil, and a lot of it. That’s how you’re going to get the *crisp*.
I grabbed this recipe from the blog, Minimalist Baker. I was so impressed with this recipe that I couldn’t stop thinking about it all day. Usually my gluten-free attempts turn out to be rock cookies or something that tastes like a bland flour ball. There’s an infamous cookie recipe that goes with that, but that’s another story… These Minimalist Baker waffles are perfection. As my sister would say, “These are the best waffles I’ve ever had!” And that’s coming from a non-gluten-free baker who can throw down a winning bake-off. My friends, we have ourselves a winner!

What makes these waffles unique is the use of oats and a list of simple ingredients, not to mention the gluten-free flour mix that I talked about this week. You’ll need a waffle iron, your batter mix, and brush to coat the coconut oil on the waffle iron.
Recipe
1. Gluten-free, all purpose flour mix + Ground flax meal
2. Minimalist Baker’s 7 Ingredient Vegan Gluten Free Waffles
Note: The recipe has some optional ingredients listed. I used olive oil, coconut oil to coat the high-heat griddle, and maple syrup. I then topped the waffles with colorful raspberries and blueberries. Perhaps next time these waffles can be my dessert. Next time, chocolate chips and a scoop of coconut ice cream on top.
My Favorite Gluten-Free Flour
photo credit: Veganbaking.net via photopin cc
Just because you’re gluten-free, doesn’t mean you don’t deserve a hot waffle, right off the griddle. When I went gluten-free, I thought it meant “bye-bye” to everything I enjoyed…but I was wrong. I’m not going to lie and say it didn’t take some research. Why it even included bouts of pouting, watching my sister carve her Belgian waffle into bite-sized forkfuls. But my story has a happy ending—it ends with a delicious, “the best I’ve ever had” (quoted by my non, gluten-free sister) waffle. Despite my pouts and foot stomping, my sister was kind, dried my tears and sent me a blog post from Minimalist Baker. If you haven’t explored the Minimalist Baker blog, well then, you must. If the horde-full of gluten-free ingredients are impeding on your baking style, you’re not alone. With all of the xanthem-“what’s?”and guar gums, which sound more like something you scrape off the bottom of your shoe, shopping for gluten-free, all purpose flours seems daunting. Luckily for you, because my sister is so kind, I will pay-it-forward and share my little secret with you. Before we make the gluten-free waffles (I will share that with you Friday—sneak peek below), it’s crucial to start with the right flour. Of course everyone is different, and you’ll discover what works best for you, but here is what I know to be my very own life-saving, all purpose, flour mix.

Note, if you don’t feel great after gluten-free cookies that are store bought or made from a pre-mixed GF, all purpose four, it’s because of all the gums and starches that aren’t easy to digest. The reason I picked quinoa, coconut and white rice flours is because they are foods that I eat often, therefore my body can digest them better. Try flours that you enjoy eating. Just know that all fours have different baking densities so it may take a couple several tries! Have fun experimenting. I use arrowroot starch because I find it better to digest compared to tapioca. Also, instead of using binding ingredients such as xantham gum or guar gum, I use ground flax meal. You should combine the flax with boiling water to create a gooey paste.
Recipe
Yields about 4 C | Prep time – 15 min.
1 1/3 C Quinoa flour
1/2 C Coconut flour
1 1/4 C White rice flour
1 1/4 C Arrowroot starch
Ground flax + hot water
Mix ingredients together. You can use cup for cup of GF flour for each cup of all purpose flour. Boil water and add double the amount of water to the flax meal. Substitute the amount listed for xantham gum, guar gum, agar gum, or other binders in the recipe you’re following. If the recipe doesn’t call for gums, use 1 T of flax meal and 2 T of hot water for the batch. Now you’re all set for waffles…see you back here Friday for this amazing recipe by Minimalist Baker!
Remix Your Butter

Today I finished yet another jar of sunflower seed butter—the Sunbutter brand. My favorite nut butters are the ones you grind yourself, as far as I can get away from processed food, aka Jiffy brand. I haven’t seen a grind-it-yourself sunflower seed machine at a grocery store, so I took it upon myself to make my own sun butter this morning! It was amazingly easy, not to mention how fresh and good it tasted.
You’ll want a food processor, olive oil, salt, and sunflower seeds.
First, spread the seeds out on a non-stick pan. The more thinly layered, the more evenly it toasts. Set your oven on broil—high—and watch the seeds carefully until they are golden. You may need to disturb them with a spatula once or twice for an even toast. When you take them out to cook, they will continue to toast on the hot pan, so take them out sooner than you think!

Let the seeds cool and then place them in the food processor. Add 2 tablespoons of EVOO and grind the seeds. Keep adding 1 T at a time until the seed butter is moist and sticks together. It will be powdery if there isn’t enough oil. Add the amount of oil you want to get to the consistency you’re looking for (like your favorite nut butter).
I added 6 tablespoons, but that’s because I basically can drink olive oil…so good—on everything.
Next, add salt to taste.

Now enjoy on bread, fruit, in smoothies, or by the spoonful! Or, how about sunbutter fingers? 🙂
Enjoy!

Chocolate-Dunked Ginger Molasses Chews

It’s been a while since I’ve last posted—new job, new apartment and new cat! Wishing you a happy Monday, all the same, and I want to share a recipe with you that you’ll want to try soon. Very soon.
If you’ve ever reached for a cookie instead of a cupcake, you’re not alone! I prefer chewy over fluffy any day. Not to say there isn’t a cake I love out there, but sometimes I really crave a bite of a sweet, salty, soft cookie. The fact that you can easily personalize a cookie is fun and attractive. Nothing beats a chocolate addition, like this chocolate-dipped bad boy seen above. If I’m making it, I have to incorporate chocolate somehow, in some way. Ginger Molasses Chew just got dunked!

The best part of this recipe is the texture and SIZE of the cookies. (Well maybe the size was more of my doing, but as I say, exercise your will as the creator!). After combining all the ingredients and rolling (and tasting) the dough into balls, pop them into the oven. Keep a careful eye on them and make sure that they are golden brown on the bottom, but not over cooked. Always, always, think “underdone” for baking cookies. This is how the chewiness happens.
Follow this recipe from Table for Two, or your favorite molasses cookie recipe.

After melting Trader Joe’s dark chocolate—most cost-effective bar I’ve seen for quality and size—dunk half of your cookies and spread for an even and precise finish. For a festive “Let’s party!” cookie cake, shower colorful sprinkles on the warm chocolate before it hardens. Give the cookies a little pat, and then off they go into the fridge to harden.
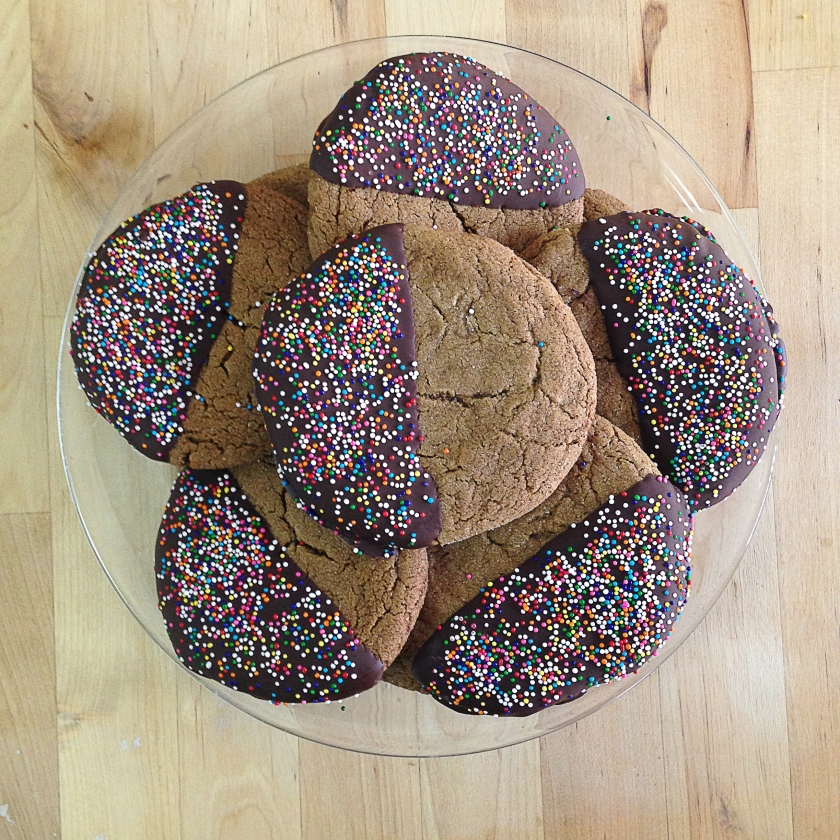
Lastly, eat as is, or do what I did and make a cookie cake. I arranged the cookies on a cake plate and stuck candles on top. After my sister’s birthday promenade, they were devoured with no mercy. No cake cutting and no dirty plates, just cookie in hand…and sprinkles to spare.

Power Up, Green Juice and Chia Kombucha

Hope you all had a wonderful family-, friend-, food-filled Christmas and New Years! If you’re like me, you enjoyed all the foods that come with the holidays. Cinnamon rolls, roasts, dinner rolls, cookies… For Christmas Eve, my family always makes Cioppino, accompanied by fresh sourdough bread. On Christmas, I was spoiled with rosemary pork tenderloin, brown rice, peas, garlic bread and, my absolute favorite, Brussels sprouts!

Dessert was filled with chocolate pixies, orange scented cookies, Russian tea cakes—I could go on and on, but let’s get to that green drink photo. With all of this delightful holiday eating and my tupperware with leftovers becoming bare, I’m dying for something fresh, cold and nourishing. I had my full share of all the foods I’ve ever wanted this season and now I’m ready for something fresh to start off the new year.
This morning I juiced kale, cucumber, celery, apples, and carrots. Green drinks make me feel so good…I can almost hear my body thanking me. But this kind of drink needs some sweetness, otherwise I feel like I’m mowing the lawn, or out grazing with the cows. Surprising enough it doesn’t take much to turn this “pasture” drink into perfection—apple and carrots will do the trick. However, in order to really kick off the new year, I thought I’d try boosting my drink with kombucha. I poured in a chia seed kombucha: Fruit juice and protein boost. Mark of a true winner!

(photo credit; sourced by Photo Pin)
Recipe
1 Cucumber
1/2 Celery bunch
1 Bunch kale
3 Bunch spinach
3 Carrots
2 Apples
Pour a glass of juice and add half a bottle of Synergy’s chia seed kombucha drink. For more recipes, follow my “Juice It” board on Pinterest for recipe links.
If you don’t have a juicer, and you love juices, I highly recommend investing in a good one. If you’re not sure about juicing, make this recipe by buying a vegetable based juice and add in a kombucha (since that’s essentially what this is).
Still can’t decide? Further investigate with fresh juices at grocery stores, like Whole Foods, and check out the documentary—Fat, Sick and Nearly Dead (it’s pretty convincing!). With or without a juicer, I wish you a Happy New Year and a great new year with your family and friends!
Have a favorite juice or fruit/veggie combination idea? Leave me a comment and share!
Related Recipes
Green Energy Drink (by The Happy Vegan Blog)
Mean Green Juice (by Gastro Luv)
Savoury Gem Juice (by This Rawsome Vegan Life)
Tropical Papaya Batido Fruit Shake (by Skinny Taste)
